![]()
Show and tell for designers
What are you working on? Dribbble is a community of designers sharing screenshots of their work, process, and projects.
![]()
![]()
![]()
![]()
![]()

A community of designers sharing their work, process, and current projects.


A lot of you kind folks have been asking questions about my process lately and so I thought that this little doggy animation would be a good way to illustrate just that.
Ok so to the juicy stuff.
1. Character design
Design your character.. That’s a sweet character dude, good job!
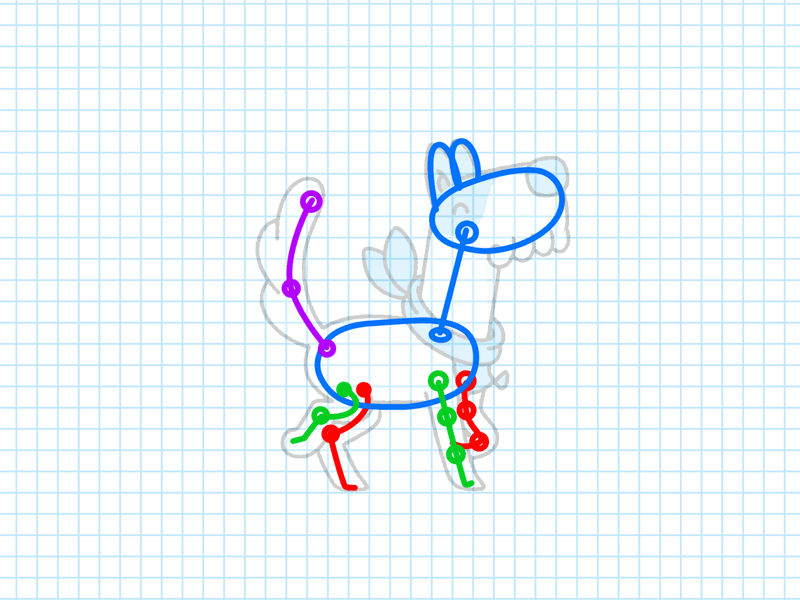
2. The Bones thugs and ahh forget it..
Bring your character into After Effects. Try to figure out all the joints n stuff in the characters body and build these up by individual strokes and shapes(that’s the colorful thingy you see inside the dog). Try to color code the front and rear limbs differently, this will make it easier to grasp the depth of the character. Man you’re killing it so far, 5 stars!
3. Animatic animation
Now here’s where it get’s a bit tricky. I would first & foremost strongly recommend anybody that is truly serious about this to grab an ex of Preston Blairs Cartoon Animation. It’s jam-packed with insights. ”But I don’t care about books, I just like to make stuff!” Well that’s been working for me the last 10 years to so Im not judging. Enough with the lecturing, lets get to it! Take your little bone dude and start animating it."So why are we animating this first?" Well it’s just a hell of a lot easier to tweak. Remember, even if this phase seems simple you need to put in all your love here cuz you’re basically pacing the whole animation.
4. Final Animation
So now when you got your little bone dude doing backflips and wheel kicks it’s time to put the real deal in motion. In my dog example I’ve used shape layers for the different body parts. You will also notice that the final animation and animatic are a bit offset and this is because the animatic is just a reference and should always only be a reference, the final animation is what counts.
*drops mic
Check out my patreon page if you're interested in my animation process and picking up some tips & tricks.
More stuff on my instagram