These 6 essential tools will release, version, and maintain your NPM modules for you
Learning how to implement them for your own projects will save you a ton of time!

Managing open source projects is way too much work.
That’s why your favorite obscure library with 1 or 2 contributors has not merged your pull request.
In order to remedy this situation, a suite of automation tools can be employed to free you from the shackles of keeping dependencies up-to-date, ensuring code quality, and releasing new versions of your software.
Unfortunately, we can’t automate away all of the maintenance, but we can deal with a lot of it.
First of all, you’ll need an npm account, and a github account for these to work.
Let’s get started.
1. Automate your releases and semantic versioning with semantic-release
This first tool really solves the biggest pain point in my opinion. Releasing new versions of your software.
When using it correctly, semantic-release will calculate new version numbers when necessary, taking the emotional part of deciding when to bump a version number out of the equation.
It also publishes you package to npm, and tags a new release in GitHub. This generates a nicely formatted Releases page detailing the changes that make up every new version!
First, install the semantic-release-cli tool:
npm i -g semantic-release-cli
Then, use it to set up your project. Run the following in the npm module you’re working on:
➜ semantic-release-cli setup
? What is your npm registry? https://registry.npmjs.org/
? What is your npm username? patrickleet
? What is your npm password? [hidden]
? What is your GitHub username? patrickleet
? What is your GitHub password? [hidden]
? What is your GitHub two-factor authentication code? [hidden]
? What CI are you using? Travis CI
? Do you want a `.travis.yml` file with semantic-release setup? Yes
This will set up all necessary connections and authentication with Travis, Github, and NPM.
Here’s the new package.json file.
{
  "name": "open-source-setup",
  "version": "0.0.0-development",
  "description": "",
  "main": "index.js",
  "scripts": {
    "test": "echo \"Error: no test specified\" && exit 1",

  },
  "author": "",
  "license": "ISC",
  "repository": {
    "type": "git",
    "url": "https://github.com/patrickleet/open-source-setup.git"
  }
}
Running semantic-release-cli setup added two new scripts to our package.json file. semantic-release which calls the devDependency by the same name, is what calculates the version and prepares the build’s package.json file by replacing 0.0.0-development with the newly calculated “semantic version”, or “semver”.
The next script travis-deploy-once will run the actual release portion. However, builds can be run in multiple environments in Travis at once. We need travis-deploy-once to ensure that the actual release happens only once, when all builds have finished, instead of releasing for every tested Node version.
The setup command will also add the required repository section to your config if it is missing, and install the new required devDependencies.
Lastly, a “travis.yml” file was also generated with the following content:
language: node_js
node_js:
  - node
  - 10
  - 8
cache: npm
install:
  - npm install
  - npm install -g codecov
script:
  - npm run lint
  - npm run test
  - codecov
branches:
  except:
    - '/^v\d+\.\d+\.\d+$/'
jobs:
  include:
    - stage: deploy
      if: branch == master && !fork
      node_js: 'node' # pre-installed version
      script:
        - npm install -g semantic-release@^15
        - semantic-release
2. Use commitizen with cz-convential-changelog to capture additional details about each commit
semantic-release needs a little help to actually calculate the new version, though, given that it doesn’t actually understand what your code does, an obvious prerequisite to understanding if there are breaking changes, and thus still relies on the developer to tell it.
The way it does this is through the commit messages that have occurred between the previous release and the current release.
Consider the following examples:
git commit -m 'unhelpful'
# semantic-release has no idea what you did
git commit -m "feat(Customers): Add new customer API endpoints to be more human friendly, removed delete route and replaced it with deactivate
BREAKING CHANGE: The old /delete url is no longer supported."
# semantic-release knows you wrote a new feature. That's a minor version bump. Also, there is a breaking change! This calls for a major bump instead!
The problem with this is now you’re expecting people to know and/or care about your rules about how you should write commit messages.
Don’t worry, there’s a module for that!
It’s called commitizen, and when a user runs it, it prompts the user with a wizard to create their commit message. It asks a series of questions to do so.
First, to install:
npm i --save-dev commitizen cz-conventional-changelog
commitizen is the tool that provides the wizard, and cz-conventional-changelog is a plugin that describes the desired commit format.
In package.json make the following changes:
// package.json
{
  //...
  scripts: {
    "commit": "git-cz",
    // ...
  },
  //...
  "config": {
    "commitizen": {
      "path": "./node_modules/cz-conventional-changelog"
    }
  }
}
Now instead of commiting with git commit -m "", we can use npm run commit
➜ npm run commit
> open-source-setup@0.0.0-development commit /Users/patrickscott/dev/patrickleet/open-source-setup
> git-cz
/Users/patrickscott/dev/patrickleet/open-source-setup
/Users/patrickscott/dev/patrickleet/open-source-setup
cz-cli@2.9.6, cz-conventional-changelog@2.1.0
Line 1 will be cropped at 100 characters. All other lines will be wrapped after 100 characters.
? Select the type of change that you're committing: chore:    Other changes that don't modify src or test files
? What is the scope of this change (e.g. component or file name)? (press enter to skip)
 release
? Write a short, imperative tense description of the change:
 added commitizen and cz-conventional-changelog
? Provide a longer description of the change: (press enter to skip)
 These dependencies allow users to commit in the desired format by using npm run commit instead of git commit -m
? Are there any breaking changes? No
? Does this change affect any open issues? No
[master 7a98de5] chore(release): added commitizen and cz-conventional-changelog
 3 files changed, 5989 insertions(+)
 create mode 100644 .gitignore
 create mode 100644 package-lock.json

PRO TIP: You’ll still get Pull Requests that don’t follow these rules – in those cases, select “Squash and Merge” instead of the default “Create Merge Commit”. You’ll be able to enter a new commit message that will trigger a new release.
3. Run Automated Tests that generate Code Coverage reports
Releasing just anything isn’t a great practice. This article isn’t about testing, but, if you aren’t running automated tests as part of your release process, you’re doing it wrong.
I really like jest for this. As such, I will add the minimal set up for jest.
Whatever you use, it’s important that you are generating coverage reports! Jest does this out of the box by simply using the --coverage flag. I also find it’s mocking functionality to be really simple to use.
To set up jest and report coverage, make the following changes:
npm i --save-dev jest
mkdir __tests__
touch jest.config
Many people like putting their jest config in their package.json. I think it’s cluttered enough as is, so I usually use the following jest.config
{
  "testEnvironment": "node",
  "modulePaths": [
    "src",
    "/node_modules/"
  ],
  "coverageThreshold": {
    "global": {
      "branches": 100,
      "functions": 100,
      "lines": 100,
      "statements": 100
    }
  },
  "collectCoverageFrom" : [
    "src/**/*.js"
  ]
}
And in package.json :
  "scripts": {
    "commit": "git-cz",
    "test": "jest --config jest.json --coverage",
    "semantic-release": "semantic-release",
    "travis-deploy-once": "travis-deploy-once"
  },
My test repository has 0 files, and 0 tests, so to fix that quickly, I created two files in this commit. Given it’s a bit of a long article already, and it’s out of scope, feel free to check those files out there.
You’ll also want to add coverage to your .gitignore file.
Here’s the new output of running npm run test
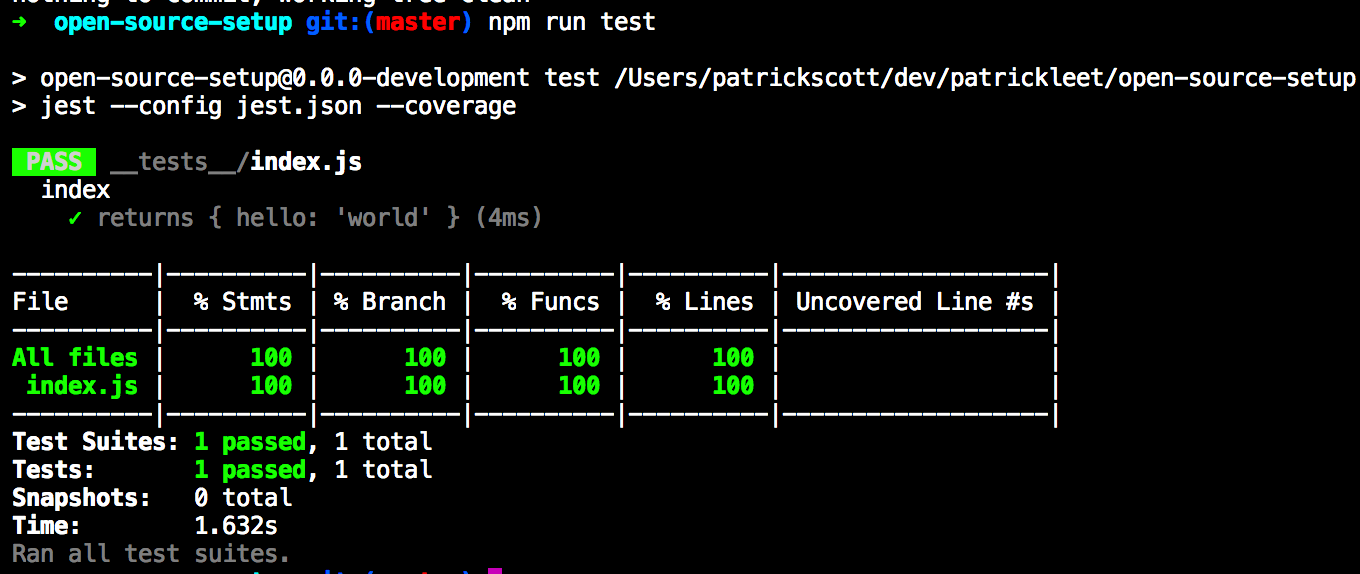
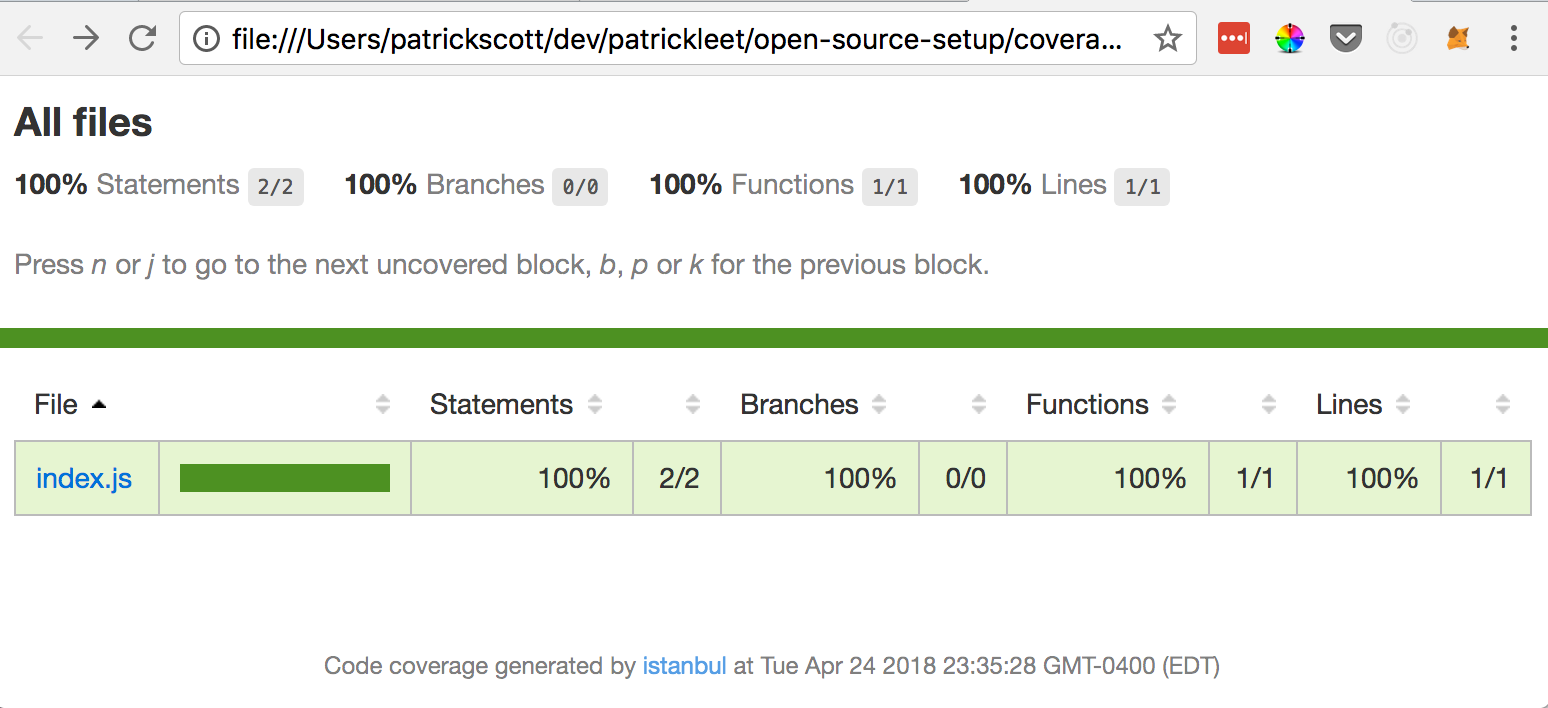
A new folder coverage is also generate with the results. Check it out by running open ./coverage/lcov-report/index.html.
4. Maintain coverage standards with Codecov
With the jest setup, the project is now outputting a coverage folder. This is pretty much the only requirement to set up codecov when you’re project is open-source and running on Travis.
By setting up codecov, you’ll get a nice shiny badge on your README, advertising your well-tested code, as well as automated comments on all Pull Requests detailing how changes affect coverage.
I’ve already included the required changes in the .travis.yml file above so you’re all set here if you’re following along.
Also head on over to CodeCov and create an account by logging in with GitHub and granting appropriate permissions.
5. Ensure consistent code formatting, and avoid simple mistakes by Linting your code
While we’re ensuring code quality, we’ll also want to make sure all code passes a linting test before we allow it to be deployed.
It’s up to you what standard you prefer! Some like airbnb, others prefer “standard”.
Pick what works for you and your team, but please, pick something!
I’m gonna go with the standard named standardjs which, despite it’s name, is not a standard. But I still dig it.
Let’s install eslint and run the setup.
npm i --save-dev eslint
Running npx eslint --init will start a wizard to install and configure the correct dependencies for your selections.
➜ npx eslint --init
? How would you like to configure ESLint? Use a popular style guide
? Which style guide do you want to follow? Standard
? What format do you want your config file to be in? JSON
As a result, a very simple config, .eslintrc.json was generated.
{
    "extends": "standard"
}
To perform the lint, we need to add some scripts to package.json
  "scripts": {
    "commit": "git-cz",
    "lint": "eslint src __tests__",
    "lint:fix": "eslint --fix src __tests__",
    "test": "jest --config jest.json --coverage",
    "semantic-release": "semantic-release",
    "travis-deploy-once": "travis-deploy-once"
  },
The command is simple, it takes in a list of folders to lint using the settings in .eslintrc.json. I like to create the second command with --fix to autofix problems when I’m running it locally.
Here’s an example of the difference
➜ npm run lint
> open-source-setup@0.0.0-development lint /Users/patrickscott/dev/patrickleet/open-source-setup
> eslint src __tests__
/Users/patrickscott/dev/patrickleet/open-source-setup/src/index.js
  1:44  error  Newline required at end of file but not found  eol-last
/Users/patrickscott/dev/patrickleet/open-source-setup/__tests__/index.js
  3:1  error  'describe' is not defined                      no-undef
  4:3  error  'it' is not defined                            no-undef
  6:5  error  'expect' is not defined                        no-undef
  8:3  error  Newline required at end of file but not found  eol-last
✖ 5 problems (5 errors, 0 warnings)
  2 errors, 0 warnings potentially fixable with the `--fix` option.
➜ npm run lint:fix
> open-source-setup@0.0.0-development lint:fix /Users/patrickscott/dev/patrickleet/open-source-setup
> eslint --fix src __tests__
/Users/patrickscott/dev/patrickleet/open-source-setup/__tests__/index.js
  3:1  error  'describe' is not defined  no-undef
  4:3  error  'it' is not defined        no-undef
  6:5  error  'expect' is not defined    no-undef
✖ 3 problems (3 errors, 0 warnings)
The first time, it only told us what was wrong. When including the fix flag, 2 of the 5 errors could automatically be fixed.
The remaining three errors are due to the way jest works, which is, assuming these global variables will be defined by the test runner.
We can fix this by telling eslint that these are not issues by modifying .eslintrc.json.
{
    "extends": "standard",
    "globals": {
        "describe": true,
        "it": true,
        "expect": true
    }
}
Now running npm run lint exits with no errors.
I’ve already added this in the first .travis.yml file as well.
With that, I’m pushing my code! But we aren’t quite done yet. The next tool, however, expects us to be at the point before it can be set up.
Here is the result of the build, and a release of the package was created on Github as well as published to NPM.
I encourage you to go through the job lob on Travis and read the output to see how semantic-release calculated it’s release.
Before we continue, let’s take a second and make our README pretty (or at all). To be legit, we clearly need all the badges.
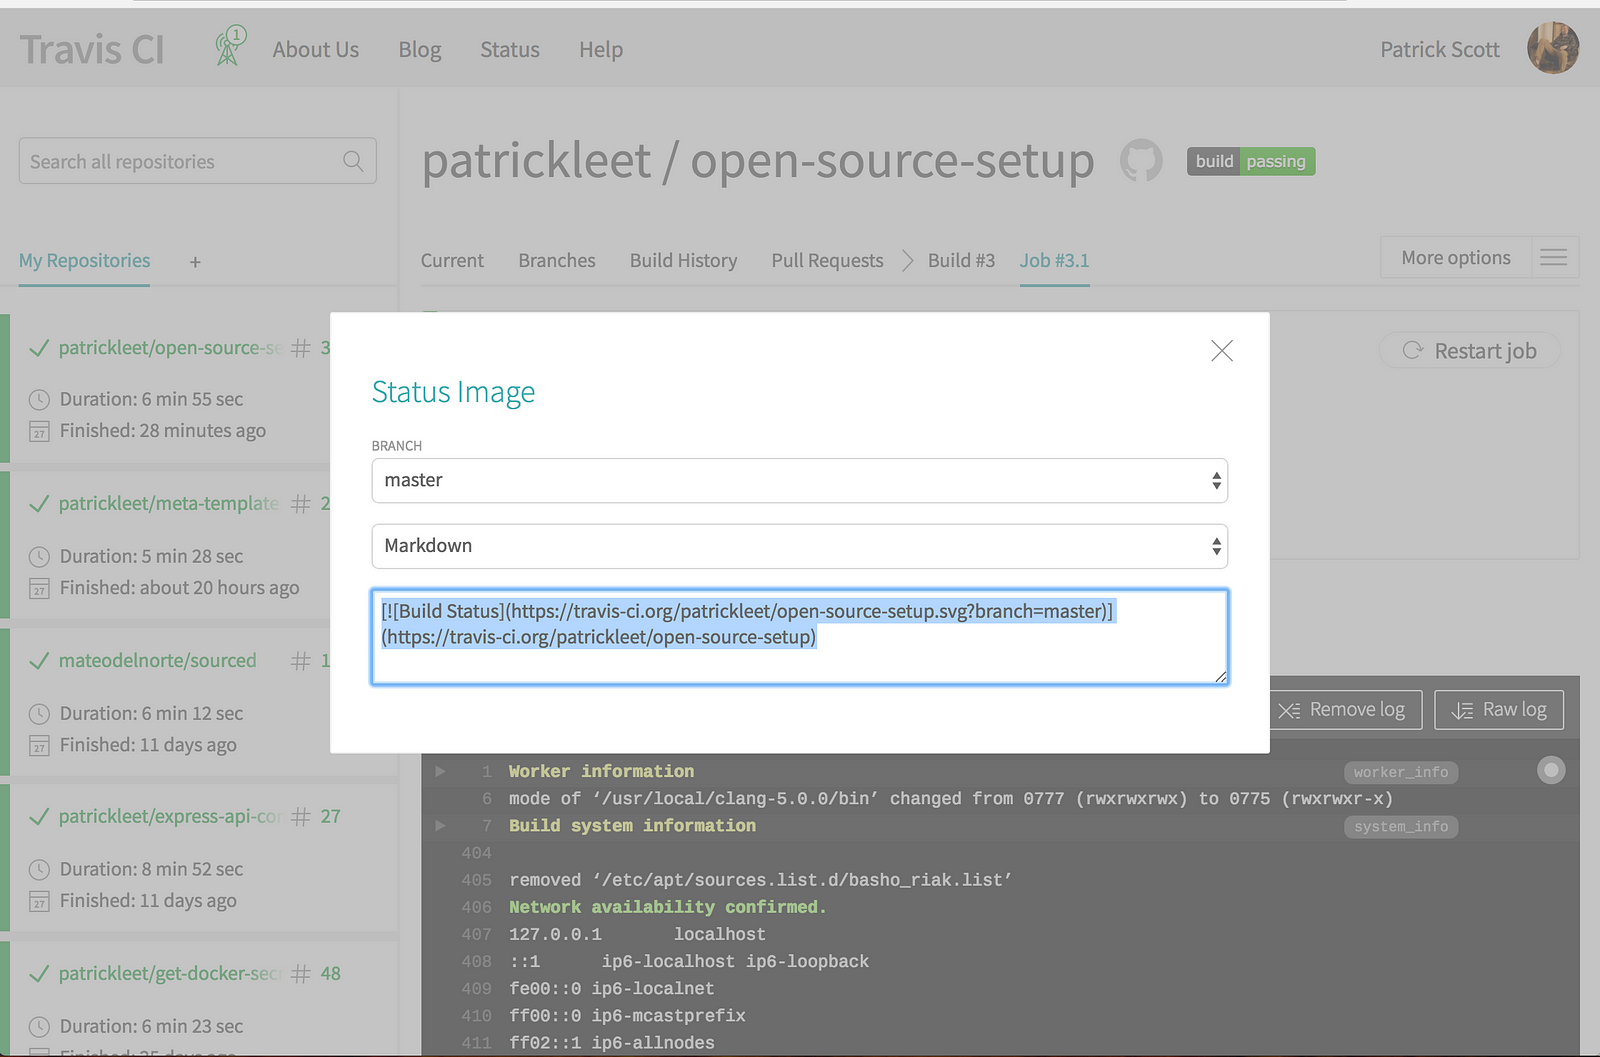
Head to Travis first and get your badge like by clicking the badge near the top of the page for the build. A popup will open with different embed codes. You’ll want markdown for the Readme file.
I think they look nice right under the heading, so go ahead in paste it there or at the top.
Next, head on over to Codecov. Navigate to your project, and grab the markdown badge showing your repositories code coverage percentage.
It can be found in the Settings | Badge section.

Here’s my README.md file:
# open source setup
[](https://travis-ci.org/patrickleet/open-source-setup)
[](https://codecov.io/gh/patrickleet/open-source-setup)
An example repository showing how I set up my open-source npm modules.
6. Keep your dependencies up to date with GreenKeeper
The first thing to become outdated in your application is your dependencies.
That’s ok.
Progress, new features, and security fixes and being pushed every day all around the world.
Problem is keeping up with them.
For this, I use GreenKeeper.io.
GreenKeeper will watch any registry you tell it to by reading it’s package.json file, and any time a new version of one of your package’s dependencies is updated, it will create a new Pull Request, using cz-conventional-changelog styled commit messages!
This means all you need to do at this point, is press merge if the travis CI build for the Pull Request passed. Which if you’re paying attention, is awesome, because this will trigger a new release using semantic-release!
There are two steps to setting up GreenKeeper.
- Follow the installation instructions over at https://greenkeeper.io/docs.html#installation. This is going to instruct you to install the GreenKeeper “GitHub App” and then grant GreenKeeper access to your repositories. For each selected repository, an intial Pull Request will be submitted that you can merge to finish enabling GreenKeeper for that repo.
- Once you merge that PR, you’ll find you need to complete an additional setup step to enable keeping the lock files up to date.
You’ll only need to install the GitHub App the first time, though, as future repositories you create will ask if you want to enable it.
It can take a while for the initial Pull Request from GreenKeeper to come in for a new repository.
Because I’ve done this before, and I know what comes next, there are some updates to the .travis.yml file that we are going to have to make.
Once you’ve merged the PR, greenkeeper will let you know about a dependency that will need to be installed and configured in order for it to be able to keep package-lock.json up to date.
Let’s go ahead and get it done with, and maybe Greenkeeper PR will come in the mean time.
In travis.yml add the following sections:
before_install:
  - npm install -g npm@latest
  - npm install -g greenkeeper-lockfile@1

before_script: greenkeeper-lockfile-update

after_script: greenkeeper-lockfile-upload
If for some reason your initial PR still hasn’t come, and it’s been more than 30 minutes, this likely means something went wrong (according to their docs) and troubleshooting steps are available here.
Once it comes, merge it! The first PR will upgrade ALL of your dependencies to give it an up-to-date baseline, as well as insert the GreenKeeper badge into the README. If this is required, GreenKeeper will let you know.
Here’s the PR for the project I’ve been working on in this tutorial.
https://github.com/patrickleet/open-source-setup/pull/1
Conclusion
This is a really solid baseline for maintaining your open source projects with minimal efforts.
I hope you’ve found it useful!
Interested in hearing MY DevOps Journey, WITHOUT useless AWS Certifications? Read it now on HackerNoon.
Please follow me, leave some claps, and check out some of my other articles.
PRO TIP: Did you know that you are allowed to give up to 50 claps to every article you enjoy? Medium uses this information to pay authors for their most useful content! Pretty cool!
You can do this by clicking/tapping, and then holding the clap button.